Deon and Dom have rendered the scenes and added the animation. The last thing to do is put it together with the sound and foley. I cannot wait to see the final film but I will not see them until after the deadline. The scenes and lighting that was used made our models look really good so kudos to Deon and Dom. I think that is pretty much the end of the project. Just waiting to see the final film.
Onto the next project...
Tuesday, 11 January 2011
Friday, 7 January 2011
Texturing
I have fully UV mapped my house and now textured it. I have sent it away to Deon to get textured as well so it will fit in with our scene (so its the same wood etc). I decided to have a go myself too just to see how it would look with my UV map and textures I would use.
I began with the door as it was small and quite simple. I UV mapped that very quickly and managed to find some seamless wood textures for it.
This is what my UV map looked like after I took it into PhotoShop and applied the relevant textures.
I was pleased with how quickly I achieved this but thought there would be a catch. Thankfully there wasn't and I was pleased with how the final door came out - after the texture was applied. The picture below shows the finished door.
My next task was the house. I had already UV mapped it which had taken me three days because of all the detail. All those beams almost killed me. It was like fitting together a very tedious jigsaw puzzle but I did it. Again I had to take it into PhotoShop and add the actually colour. I used the images I had for research and made my decisions from there. The wood for the beams I wanted to be light. This was to contrast the door but also because I wanted a timber kind of colour and I found the perfect texture for that. I then needed to add the white colour. I tried with pure white but it was too bright so I ended up with a very light grey which made the house look really good. For the roof, I found a red tile colour and applied that to it. It Came out really nice and clean too.
Here is the UV texture:
After a few slight adjustments, It came out quite nicely on my model. Below is my final textured model. There are more textures on the windows, to make them see through, and the crosshatching on the windows to make them look more like lead.
I am pleased with the way it has turned out.
I finally moved onto the trees. When I began they looked like this:
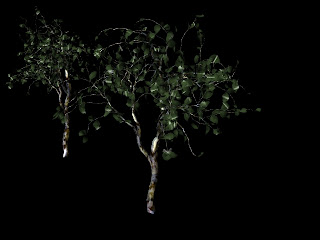
All the leaves are little planes, so I made a leaf texture in PhotoShop and then saved it as a PNG with a transparent background. This meant that when I used it as a texture, the background will still be transparent, leaving just the leaf there on the tree. The trunk was not a very nice texture so I made a texture and applied it to make it look like a birch tree.
This was the end result.
I think they look like quite good trees.
There is nothing really left for me to do. I have spoken to my group and handed over all my models and textures to Deon for him add and render the street scene. Dom is doing the animation and then using hers and Deon's machines to render (as they are beasts). So it looks like my work is done.
Wednesday, 5 January 2011
More Progress
After I had modelled the house an completely finished it, I began to start UV texture mapping it.
It took such a long time to fully texture map it. Because of all the beams on the front, I had to add every side of the beam as well as the fronts and the backs and the roof. The rest of the team has textured theirs so they want to use the same style of textures. I have passed on my model and my texture map from them to add the different maps (texture, bump, diffuse etc) to it and then add it to the street to create a whole street for the rat to run around in.
I have tried to upload the image of the UV map but the image will not up on the blog because the lines are too thin.
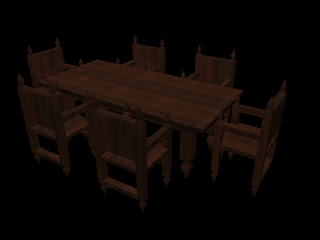
I have also finished modelling and texturing the dining table and chairs. I used the dark wood that I wanted to and spent lots of time making sure the grain was the correct way by UV mapping the table and chairs.
I sent this away to the group but they already had another in place and decided to use that one instead as it saved importing and extra tweaking.
The group have asked me to create some trees. to add to the scene.

I looked at some tutorials online and then used the paint effects to create the trees. I had to tweak them a bit, by turning it into polygons and changing the texture of the leaves. I had to create the textures on PhotoShop and then export them as PNG files to make sure the backgrounds were transparent. This made the trees look pretty respectable. I may change the texture of the trunk because I'm not too happy with it.
Progress is looking better. As a group we are almost done and soon will begin animating.
It took such a long time to fully texture map it. Because of all the beams on the front, I had to add every side of the beam as well as the fronts and the backs and the roof. The rest of the team has textured theirs so they want to use the same style of textures. I have passed on my model and my texture map from them to add the different maps (texture, bump, diffuse etc) to it and then add it to the street to create a whole street for the rat to run around in.
I have tried to upload the image of the UV map but the image will not up on the blog because the lines are too thin.
I have also finished modelling and texturing the dining table and chairs. I used the dark wood that I wanted to and spent lots of time making sure the grain was the correct way by UV mapping the table and chairs.
I sent this away to the group but they already had another in place and decided to use that one instead as it saved importing and extra tweaking.
The group have asked me to create some trees. to add to the scene.

I looked at some tutorials online and then used the paint effects to create the trees. I had to tweak them a bit, by turning it into polygons and changing the texture of the leaves. I had to create the textures on PhotoShop and then export them as PNG files to make sure the backgrounds were transparent. This made the trees look pretty respectable. I may change the texture of the trunk because I'm not too happy with it.
Progress is looking better. As a group we are almost done and soon will begin animating.
Subscribe to:
Comments (Atom)


